





Every document in your library is either a file you upload or a link to a file hosted elsewhere. You add and edit them in the Documents section of your dashboard.
This article covers adding documents one at a time. To add a lot of documents at once, see adding documents in bulk.
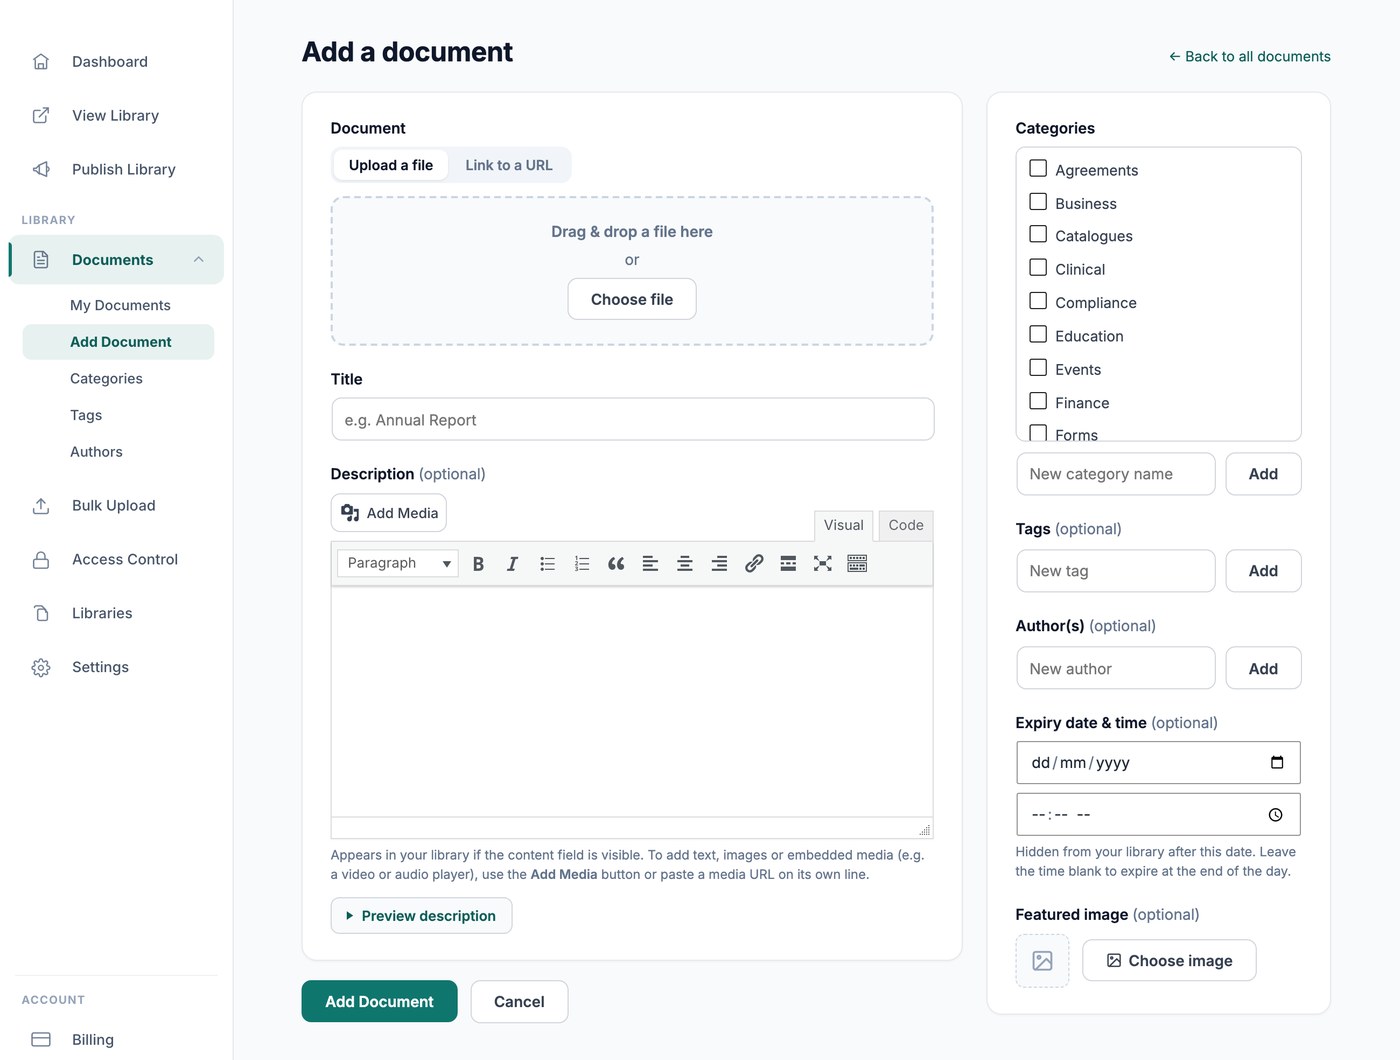
Add a document
Go to Documents → Add Document. The screen has the following fields:
- Document - Choose Upload a file or Link to a URL. To upload, drag a file onto the drop zone or click Choose file. Most file types are supported, including PDFs, Word, Excel and PowerPoint files, images, audio and video. To link to a file which already lives online, such as a Google Drive file or a video, switch to Link to a URL and paste the web address. See which file types and sizes you can add.
- File size (optional) - Auto-detected for uploaded files. Enter it manually for a URL, for example 2 MB, so that it can appear in your library.
- Title - The name of the document in your library. This is the only required field.
- Description (optional) - Appears in your library when the content field is displayed. Use the Add Media button to include images, or paste a media URL on its own line to embed a video or audio player. Click Preview description to see how it will look in your library.
- Categories - Group related documents together. Your filters and folders are built from your document categories, and each library can be limited to particular categories. Click Add to create a new category without leaving the screen. See categories, tags and authors.
- Tags (optional) - A second, looser way to label documents. Tags work alongside categories and can also be used as a filter.
- Author(s) (optional) - The author displayed against the document. This is separate from the person who added it.
- Featured image (optional) - The thumbnail for the document, which looks especially good in the grid layout. Leave it blank and a thumbnail is generated from PDF and image files where possible. See document library image options.
- Version history (Advanced plan only) - Keeps the previous file each time you replace one, so that you have a history of the document. See document version control.
- Expiry date & time (optional, Advanced plan only) - The document is hidden from your library after this date. Leave the time blank to expire it at the end of the day. See document expiry.
Click Publish to add the document to your library, or Save draft to keep working on it. Draft documents stay out of your library until you publish them.
Edit or delete a document
Go to Documents → My Documents to see everything in your library, then click a document to open it. The screen is the same one you used to add it, with a Save Changes button at the bottom.
To swap the file behind a document, click Replace file and upload the new version. The document keeps its title, description, categories and settings, so any links to it still work. See how to update and replace documents.
To delete documents, select them on the My Documents screen and delete them together.
Adding documents in bulk
There are three ways to add documents without entering them one by one:
- Bulk Upload (Advanced plan only) - Drop in a batch of files to create one document per file, or import a spreadsheet to set the title, description, categories and more for every document at once.
- Folder sync (Advanced plan only) - Connect a Google Drive or Dropbox folder to a category. The documents are created for you and stay in sync with the folder. See sync a Google Drive or Dropbox folder with your library.
- Visitor submissions - Let visitors submit their own documents through a form, which you approve before they appear. See accepting document submissions from visitors.
Next steps
With your documents added, the next step is to choose how they appear to your visitors. See document library layout to choose between a table, a grid and folders, and publishing your library to put it in front of people.