





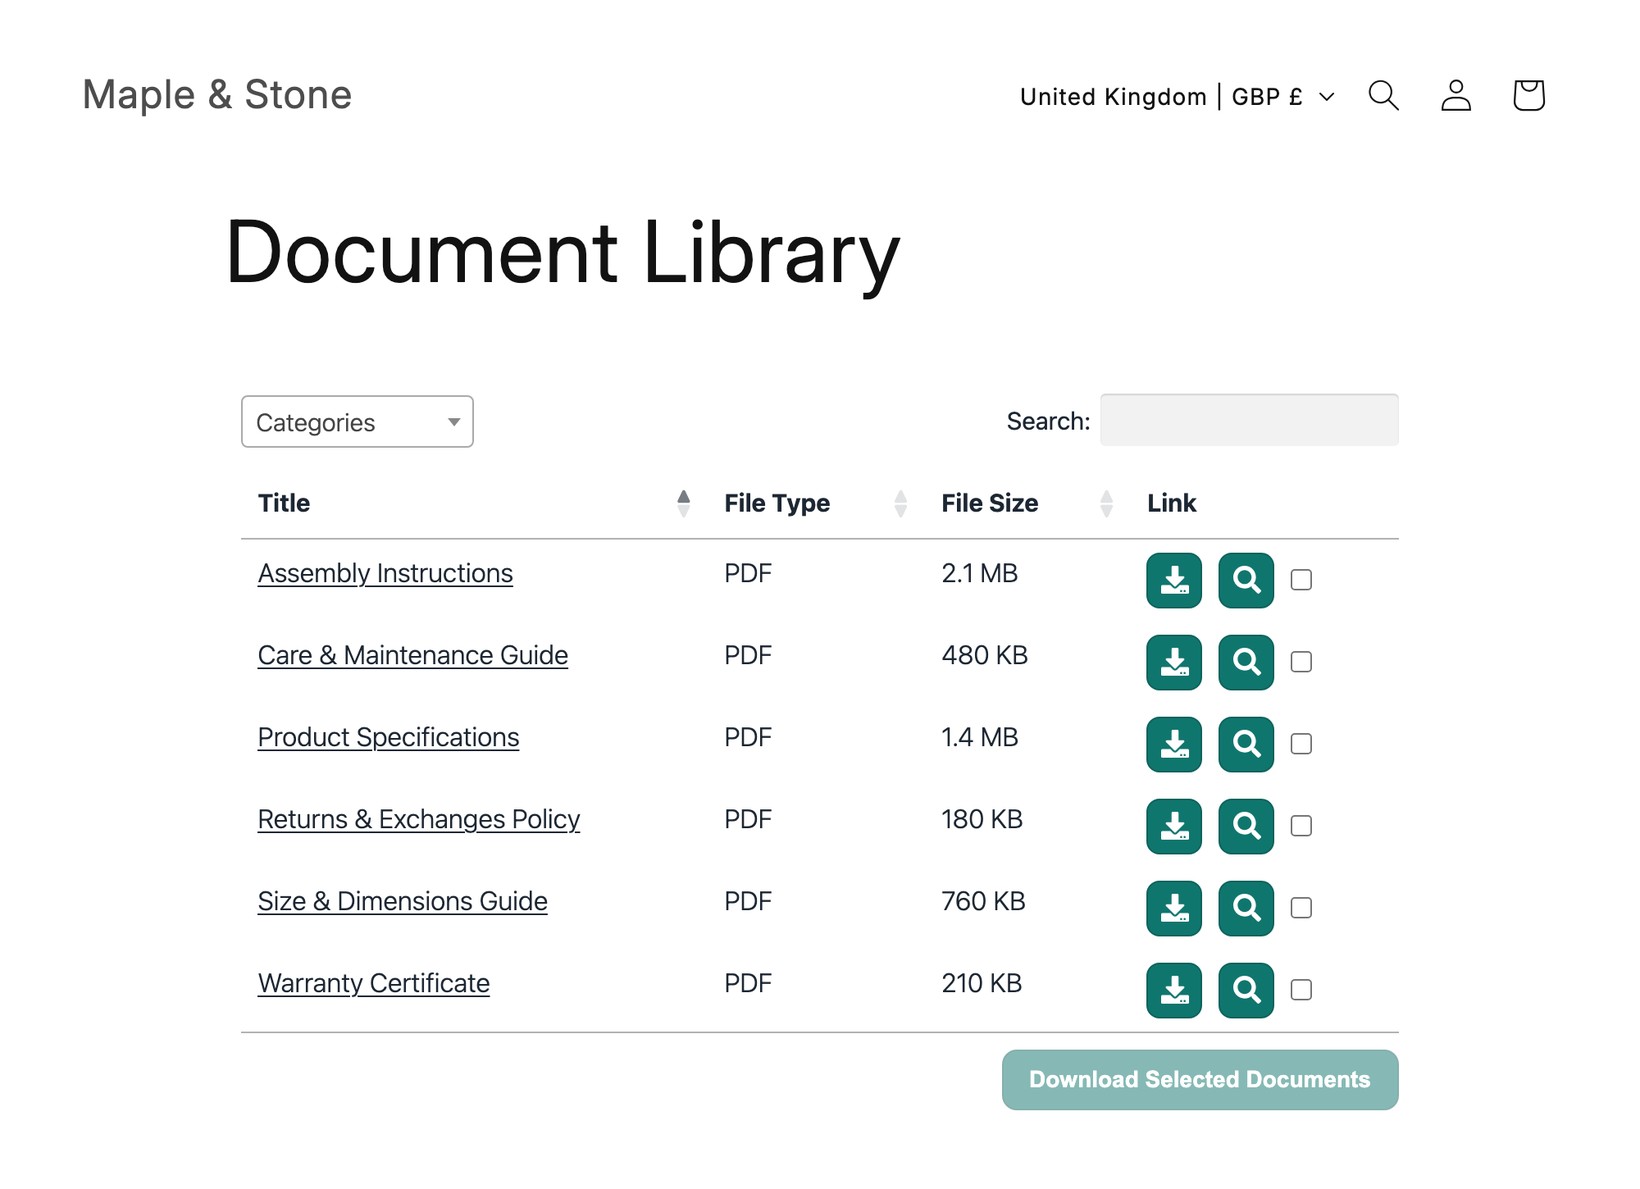
Document Library Pro è disponibile come app Shopify, in modo da poter aggiungere una libreria di documenti ricercabile e filtrabile al tuo negozio senza usare codici embed. L'app crea automaticamente una pagina principale “Documents” che elenca tutti i tuoi documenti, che puoi aggiungere al menu del negozio, e offre un modo semplice per inserire librerie di documenti in altre pagine e prodotti.
Installazione dell'app
- Nell'App Store di Shopify, cerca Document Library Pro e apri la sua scheda.
- Clicca Add app, poi Install, e approva le autorizzazioni richieste.
- Scegli un piano per iniziare la prova gratuita di 14 giorni. L'abbonamento viene fatturato in modo sicuro tramite Shopify e puoi cambiare piano in qualsiasi momento. Se annulli prima della fine della prova, non ti verrà addebitato nulla.
Dove gestire la tua libreria
I tuoi documenti e le tue librerie si trovano sulla piattaforma Document Library Pro all'indirizzo documentlibrary.app, ed è lì che li gestisci. Il compito dell'app Shopify è collegare quelle librerie al tuo negozio e facilitarne la visualizzazione.
Non hai bisogno di un accesso separato. Apri Document Library Pro dal Apps del tuo pannello di amministrazione Shopify e verrai indirizzato direttamente al tuo account Document Library Pro, già connesso. Da lì puoi:
- Aggiungi e modifica documenti, e organizzarli in categorie, tag e autori.
- Creare librerie aggiuntive che elencano un insieme specifico di documenti, ad esempio i documenti di un prodotto.
- Modificare l' aspetto e impostazioni, come colonne, ricerca e filtri.
Ogni volta che devi modificare i tuoi documenti o la tua libreria, apri l'app dal menu Apps e apporta le modifiche sulla piattaforma. Per una guida completa, vedi Aggiungere documenti alla tua libreria e creare una libreria con Library Builder. Il resto di questo articolo copre tutti i modi per mostrare una libreria nel tuo negozio.
Puoi anche creare librerie aggiuntive, ciascuna con un set diverso di documenti, e inserirle in pagine, prodotti e modelli del tema specifici. Questa guida copre tutte le opzioni.
Nota: Le prime tre opzioni in questa pagina funzionano solo quando usi l'app Shopify di Document Library Pro. Se hai acquistato Document Library Pro direttamente su questo sito senza installare l'app Shopify, puoi usare solo il metodo del codice di incorporamento.
Aggiungi la tua pagina Documenti al menu del negozio
L'app crea una pagina predefinita chiamata Documents che elenca tutti i tuoi documenti. Per aggiungere un collegamento nel menu di navigazione del negozio:
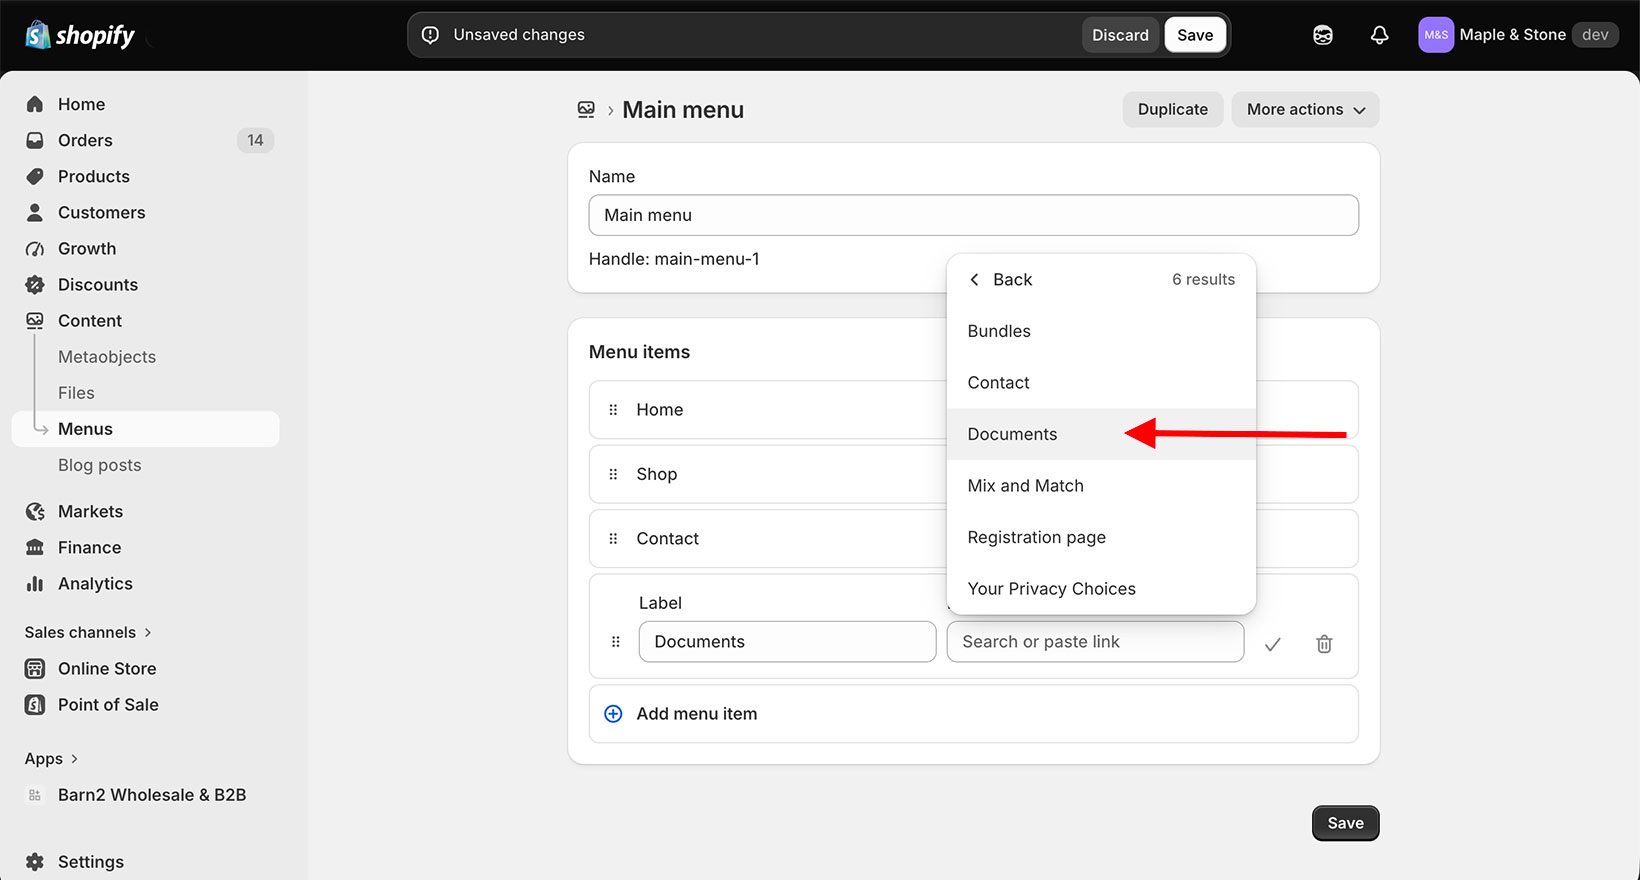
- Nell'amministrazione Shopify, vai su Contenuti → Menu.
- Apri il menu desiderato (ad esempio il menu principale) e fai clic su Add menu item.
- Nel Link , cerca e seleziona la Documents .
- Assegnagli un nome come “Documents” e fai clic su Save menu.
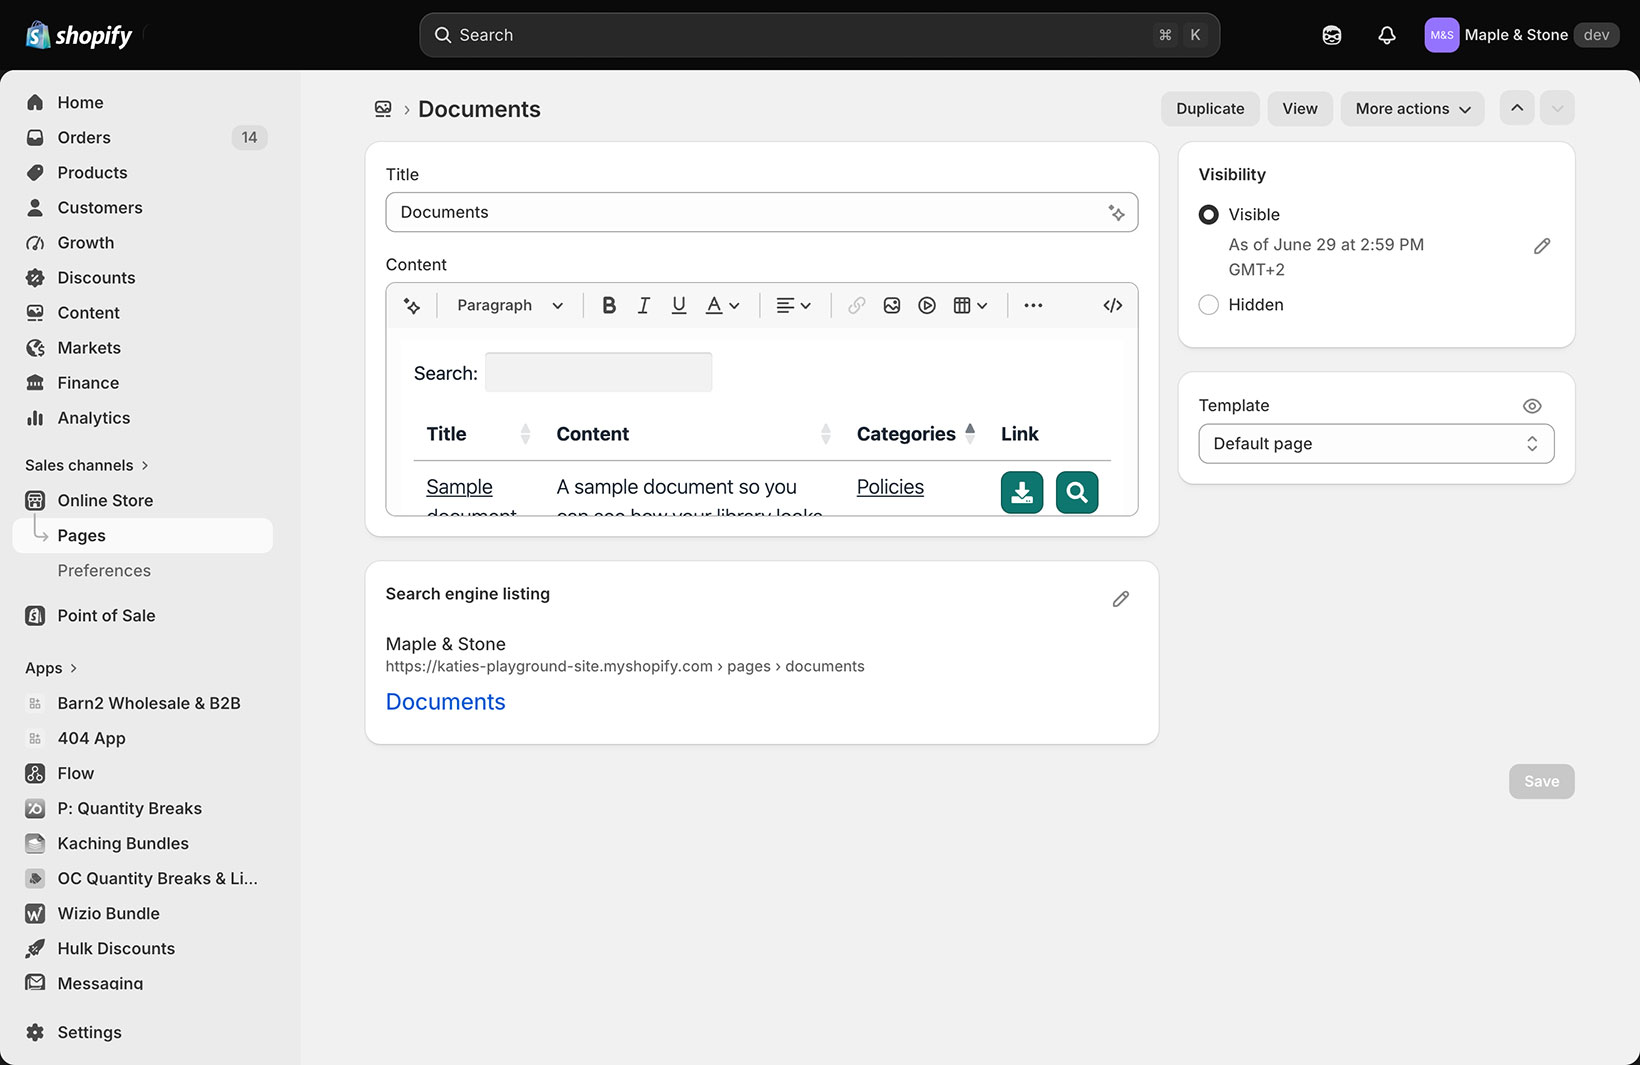
La pagina Documents e una normale pagina Shopify, quindi hai il pieno controllo su di essa. In Negozio online → Pagine puoi rinominarla e aggiungere testo e immagini personalizzati sopra o sotto la libreria, ad esempio una breve introduzione. Se vuoi mostrare documenti solo su prodotti specifici e non hai bisogno di una pagina libreria centrale, puoi semplicemente eliminare la pagina Documents.
Creare librerie aggiuntive
Oltre alla pagina Documenti principale, puoi creare librerie aggiuntive, ciascuna con un set diverso di documenti nella propria pagina della libreria. Fallo tramite la Libraries sezione dell'amministrazione di Document Library Pro.
Ad esempio, potresti volere più librerie per elencare documenti diversi su pagine prodotto diverse, oppure per mostrare librerie diverse in parti diverse del tuo negozio. Dopo aver creato le librerie extra, usa i metodi qui sotto per aggiungerle alle parti pertinenti del tuo negozio.
Aggiungi una libreria a un prodotto
Per aggiungere una libreria a un prodotto:
- Apri il prodotto a cui vuoi aggiungere una libreria.
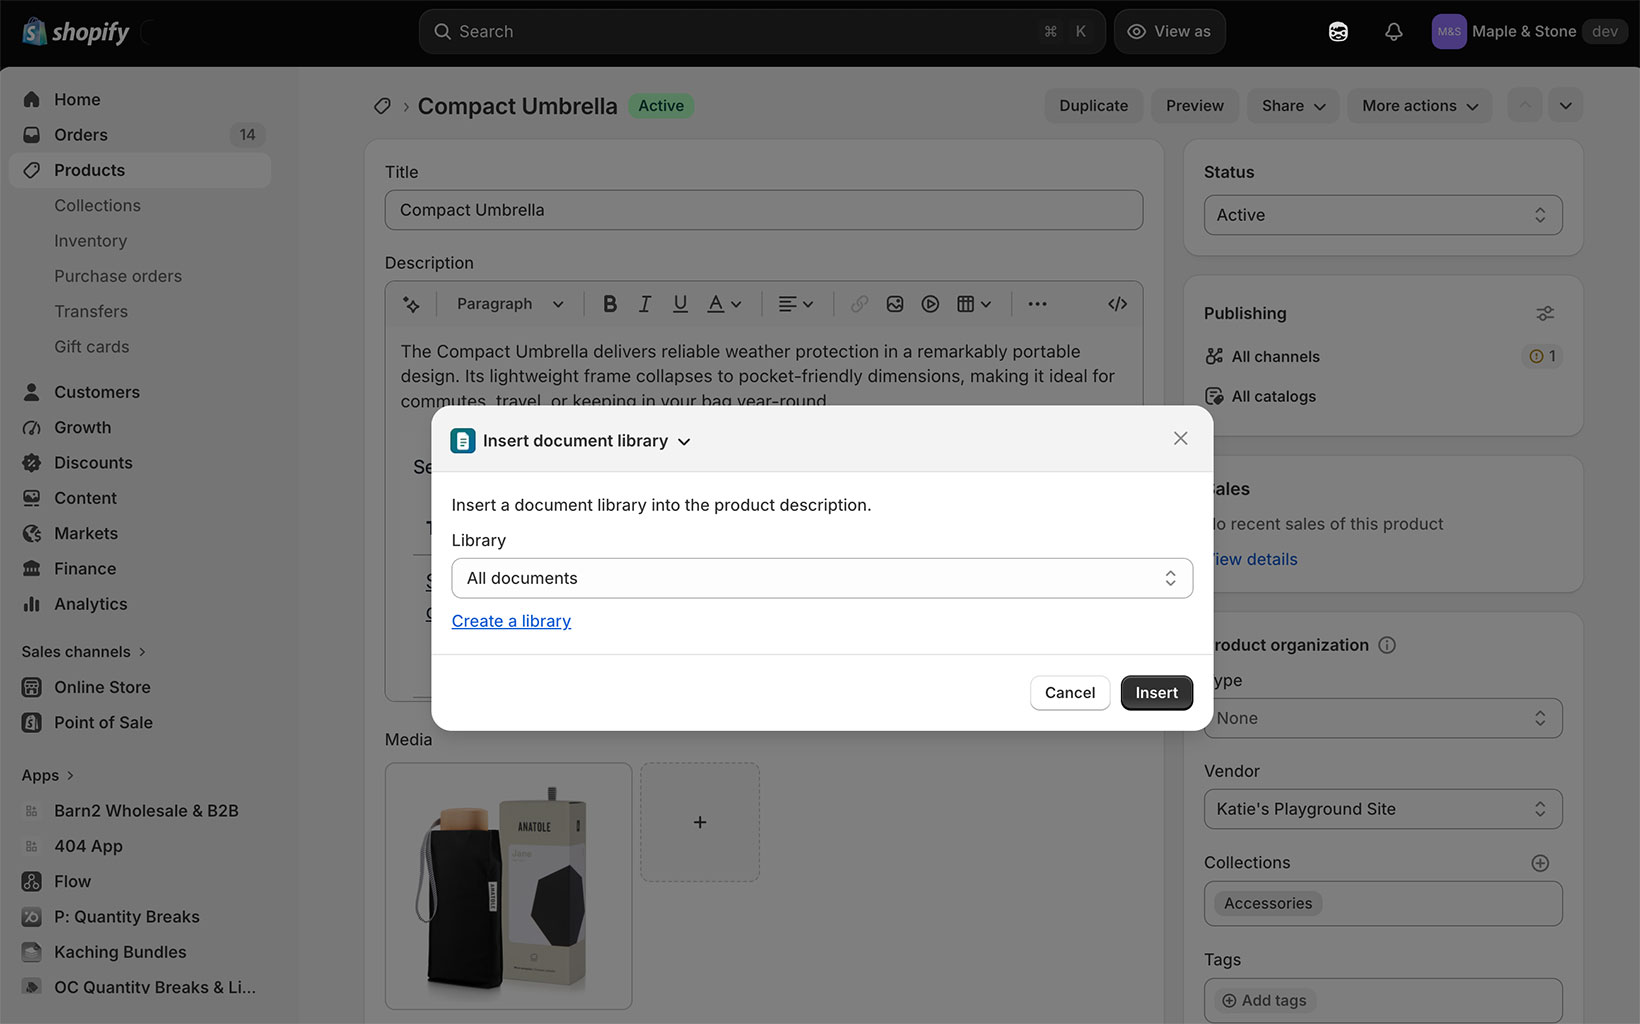
- Clicca More actions in alto a destra, poi Insert document library.
- Scegli quale libreria aggiungere, poi fai clic su Inserisci.
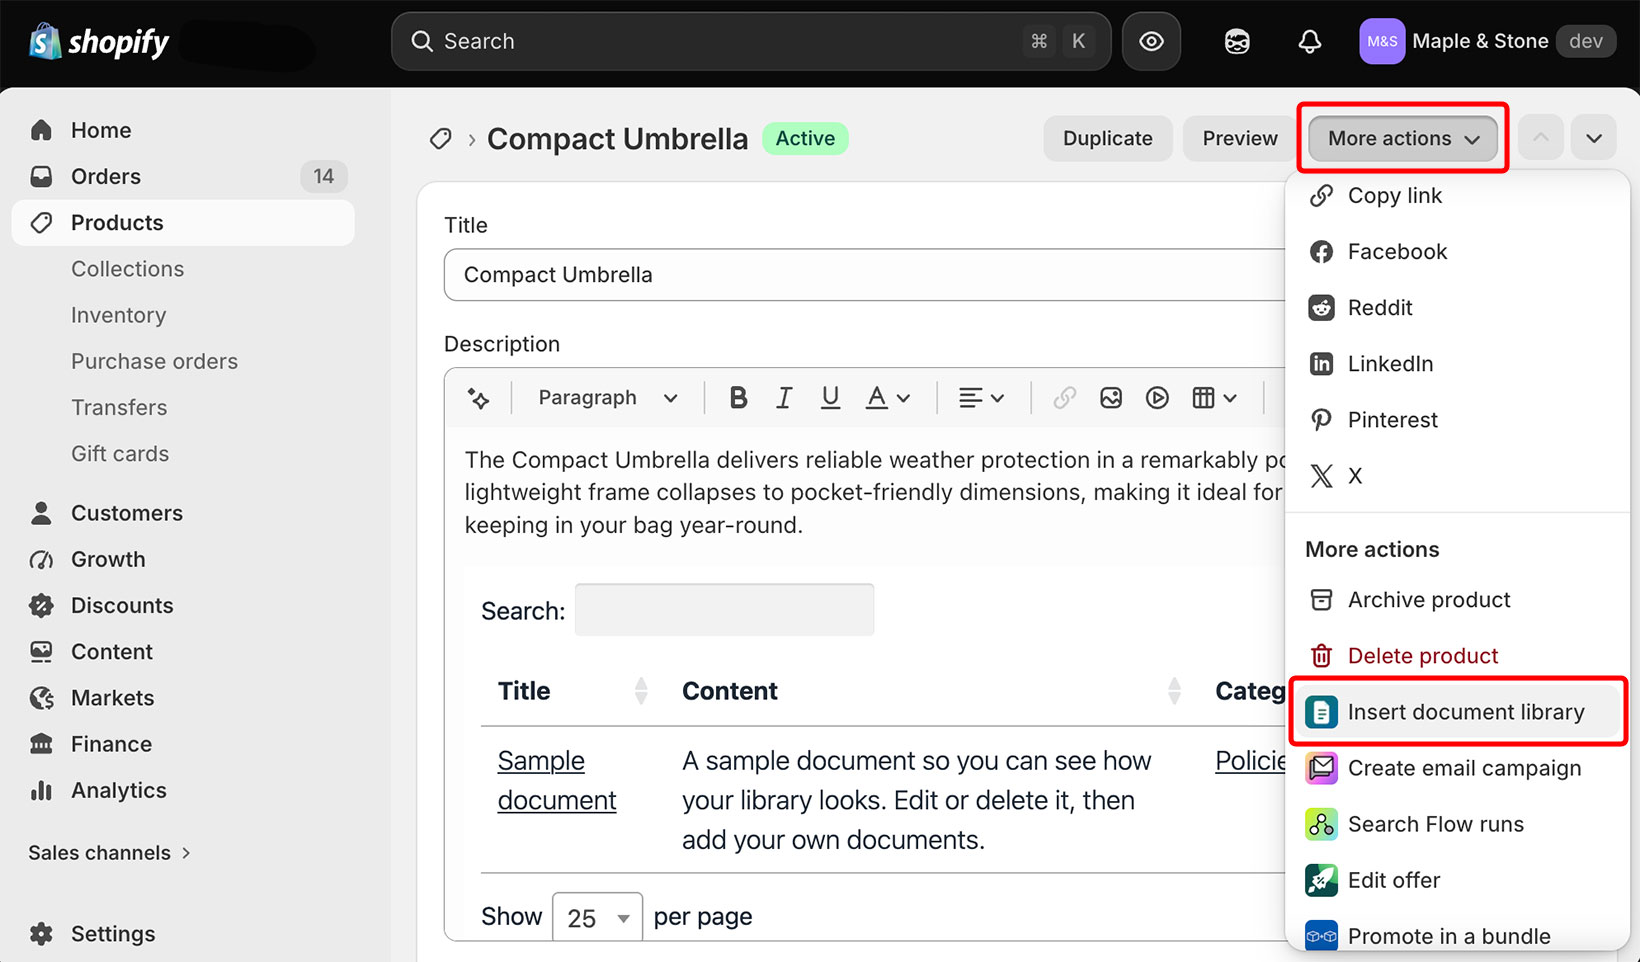
La libreria viene aggiunta alla descrizione del prodotto e appare subito nella vetrina del tuo negozio. Non c'è altro da attivare.
Vuoi aggiungere una libreria a una pagina? Usa il metodo del codice di incorporamento qui sotto.
Quale libreria viene aggiunta: Per impostazione predefinita, questo inserisce una libreria che elenca tutti i tuoi documenti. Se hai creato librerie aggiuntive, anche queste appaiono nell'elenco tra cui scegliere.
Mostra una libreria diversa su ogni prodotto
Puoi mostrare una libreria diversa su ogni prodotto. Inserisci la libreria desiderata su ciascun prodotto seguendo i passaggi descritti sopra. Ad esempio, puoi creare una libreria separata di schede tecniche per ogni prodotto e inserire quella corrispondente su ogni pagina prodotto.
Spostare la libreria all'interno della descrizione
La libreria viene sempre aggiunta alla fine della descrizione. Per spostarla altrove:
- Nell'editor della descrizione, fai clic sul pulsante vista codice (<>) nella barra degli strumenti.
- Trova il
<iframe>...</iframe>, che si trova alla fine del codice. - Taglia e incollalo dove vuoi che la libreria appaia tra i tuoi contenuti, poi salva.
Aggiunta del pannello Document library
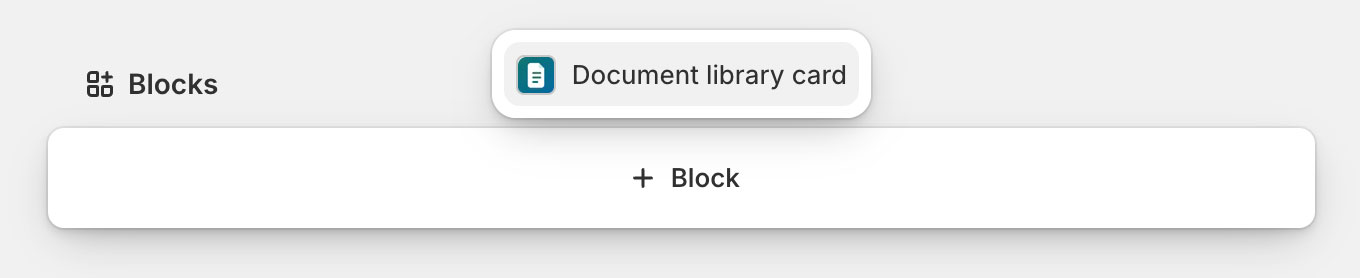
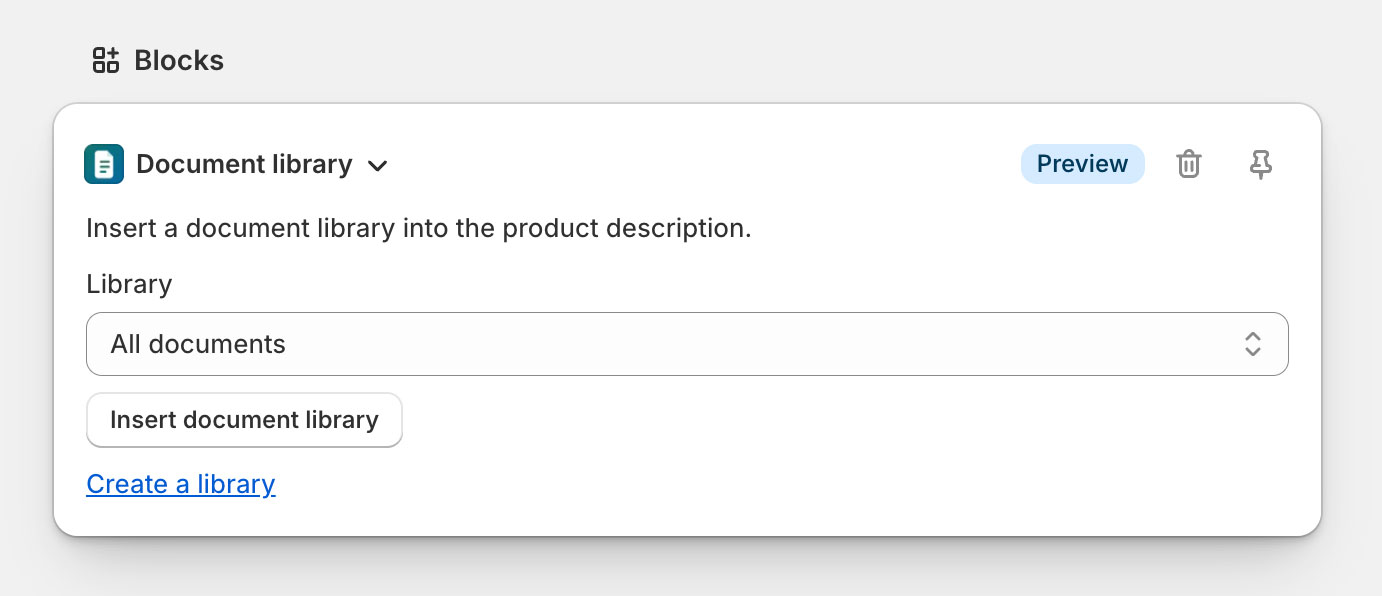
Per aggiungere librerie di documenti ai prodotti più facilmente, puoi anche aggiungere un pannello Document library card alla schermata di modifica del prodotto, in modo da non dover aprire il menu More actions ogni volta. Ti consigliamo di blocco (l'icona a puntina sul pannello) in modo che appaia nella schermata di modifica di ogni prodotto, non solo di uno. Il pannello appare nel Blocchi sezione nella parte inferiore della schermata di modifica e Shopify mantiene le schede delle app in quella posizione, quindi non è possibile spostarla più in alto nella pagina.
Scorri fino alla Blocchi sezione in fondo a un prodotto, fai clic su Aggiungi blocco, scegli Document library card, quindi aggiungila.
Aggiungi una libreria a un modello del tema
Se vuoi aggiungere una libreria di documenti a un punto fisso del tuo tema invece che all'interno della descrizione di un prodotto o di una pagina, ad esempio sotto il pulsante Aggiungi al carrello, puoi aggiungerla come blocco del tema:
- Vai a Negozio online → Temi e clicca Customize.
- Apri il template desiderato (ad esempio il template prodotto), fai clic su Aggiungi blocco nella sezione in cui vuoi la libreria e scegli libreria di documenti .
- Per impostazione predefinita elenca tutti i tuoi documenti. Per mostrare invece una libreria specifica, scegline una dal Library menu a discesa, poi salva.
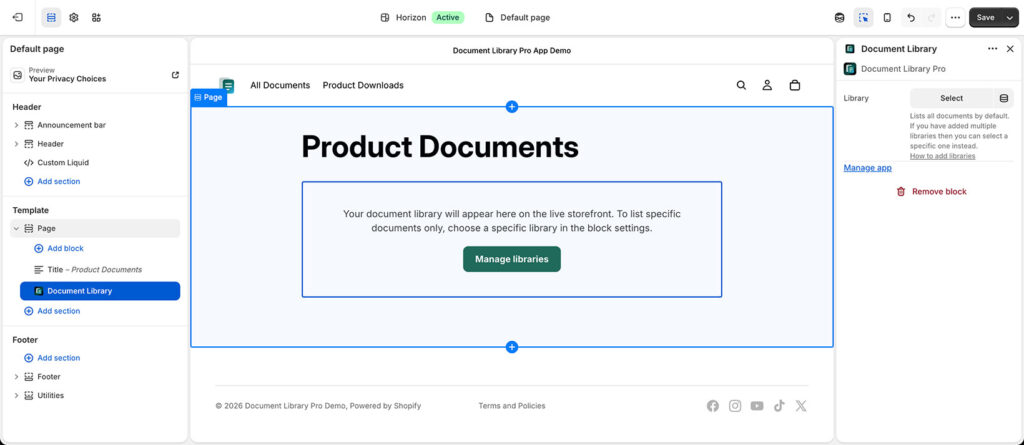
Poiche un blocco del tema e posizionato sul template, mostra la stesso libreria su ogni prodotto o pagina che usa quel modello. Per mostrare una diversa su ogni prodotto, usa il metodo di inserimento descritto sopra, che aggiunge la libreria a quel singolo prodotto.
Usa un codice di incorporamento per aggiungere librerie ovunque
Ogni libreria ha un codice embed (un <iframe>). Puoi incollarlo ovunque tu possa aggiungere HTML. Questo è il metodo da usare se usi Document Library Pro senza l'app Shopify, oppure se vuoi posizionare una libreria in un punto non coperto dai passaggi precedenti.
Per ottenere il tuo codice di incorporamento, apri prima la Pubblica Libreria pagina nella dashboard di Document Library Pro e copia il codice di incorporamento della libreria pertinente. (Se non hai ancora creato la libreria che vuoi incorporare, puoi farlo nella pagina Librerie.)
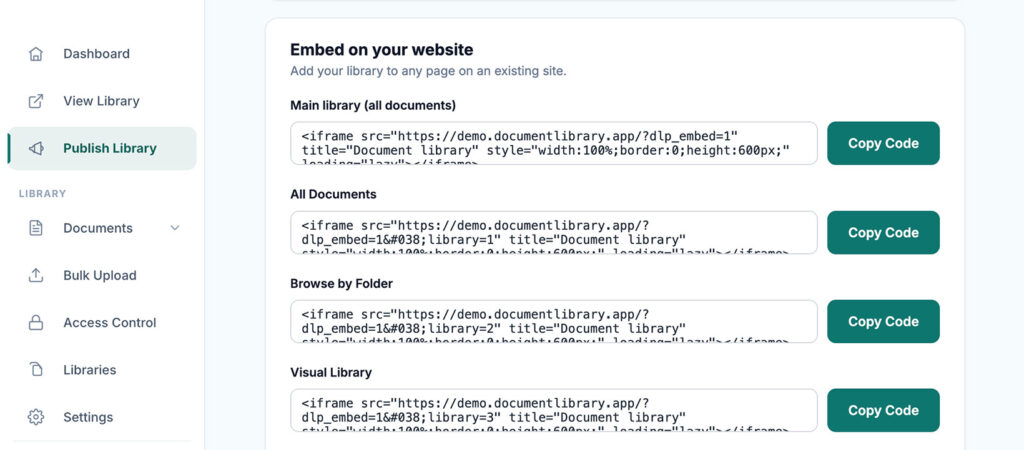
Poi, incolla il codice di incorporamento in uno dei seguenti punti:
- Descrizione prodotto: Apri il prodotto, fai clic sul pulsante della vista codice (<>) nella barra degli strumenti della descrizione e incolla il codice embed dove desideri.
- Una pagina: Vai a Negozio online → Pagine, apri o crea una pagina, fai clic sul pulsante di visualizzazione del codice (<>) nella barra degli strumenti del contenuto e incolla il codice embed.
- Una sezione del tema: in Negozio online → Temi → Personalizza, aggiungi un Custom Liquid a una sezione e incolla il codice embed al suo interno.
- Qualsiasi altro sito: Lo stesso codice di incorporamento funziona su qualsiasi sito web, non solo su Shopify.
Se il codice di incorporamento sembra essere scomparso
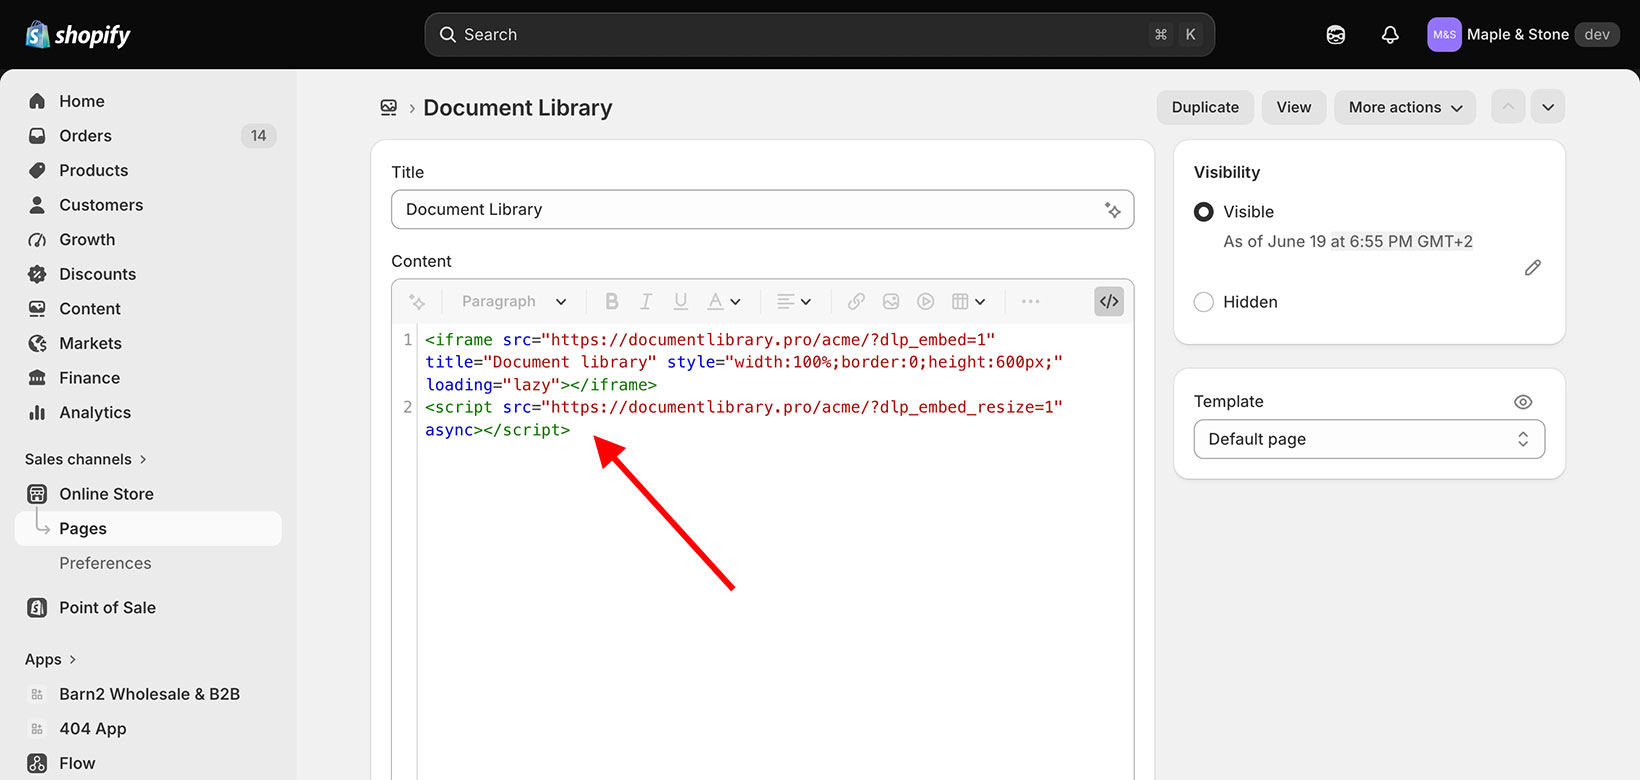
Dopo aver incollato il codice di incorporamento in Shopify, la libreria può sembrare scomparsa. Non è scomparsa. Gli editor di pagina e descrizione prodotto di Shopify non renderizzano una libreria incorporata nella scheda visuale, quindi l'area può sembrare vuota anche se il codice è stato salvato correttamente.
Assicurati di incollare il codice di incorporamento tramite il pulsante della vista codice, mostrato come <> nella barra degli strumenti dell'editor. Digitarlo o incollarlo nella scheda visuale non funziona. Dopo il salvataggio, visualizza la pagina sul tuo storefront live per vedere la libreria.
Il nostro codice di incorporamento ha due parti: un <iframe>, e un piccolo script sotto che permette alla libreria di ridimensionarsi per adattarsi al suo contenuto. L'editor di Shopify mantiene il <iframe> e rimuove lo script. Questo significa che la libreria rimane all'altezza impostata su <iframe> invece di crescere per adattarsi. Puoi modificare il valore dell'altezza nell'attributo style, ad esempio height:600px, in base alla tua libreria.
Se vuoi che la libreria si ridimensioni automaticamente, usa una delle opzioni proprie dell'app trattate in precedenza in questa pagina: la pagina Documents già pronta, l'opzione Insert document library su un prodotto o il blocco tema Document Library.